# 管理数据
# Managing data
本章基于以一个基本 Angular 应用快速上手的第二步 —— 添加导航 。在此开发阶段,本商店应用具有一个包含两个视图的商品名录:商品列表和商品详情。用户点击清单中的某个商品名称,就会在新视图中看到具有专门的 URL 或路由的详情页。
本页将指导你分三个步骤创建购物车:
修改商品详情视图,让它包含一个 “Buy” 按钮,它会把当前商品添加到由 "购物车服务" 管理的商品列表中。
添加一个购物车组件,它会显示购物车中的商品。
添加一个配送组件,它会使用 Angular 的
HttpClient从.json文件中检索配送数据来取得购物车中这些商品的运费。
# 创建购物车服务
在 Angular 中, 服务是类的一个实例, 借助 Angular 的依赖注入体系,你可以在应用中的任意部分使用它。
现在, 用户可以浏览产品信息,而应用可以模拟分享产品,以及发出产品变更通知。
下一步是为用户提供一种把产品添加到购物车中的方法。本章节将带领你添加一个 Buy按钮并且建立一个购物车服务以保存购物车中的产品信息。
# 定义购物车服务
本节将引导你创建用于跟踪添加到购物车的产品的 CartService。
- 在终端中通过运行以下命令生成一个新的
cart服务:
ng generate service cart
- 将
Product接口从./products.ts导入到cart.service.ts文件中,在CartService类中,定义一个items属性来存储购物车中当前产品的数组。
src/app/cart.service.ts
import { Product } from './products';
import { Injectable } from '@angular/core';
/* . . . */
@Injectable({
  providedIn: 'root'
})
export class CartService {
  items: Product[] = [];
/* . . . */
}
- 定义把商品添加到购物车、返回购物车商品以及清除购物车商品的方法。
src/app/cart.service.ts
@Injectable({
  providedIn: 'root'
})
export class CartService {
  items: Product[] = [];
/* . . . */

  addToCart(product: Product) {
    this.items.push(product);
  }

  getItems() {
    return this.items;
  }

  clearCart() {
    this.items = [];
    return this.items;
  }
/* . . . */
}
addToCart()方法会将产品附加到items数组中。getItems()方法会收集用户加到购物车中的商品,并返回每个商品及其数量。clearCart()方法返回一个空数组。
# 使用购物车服务
本节会教你使用 CartService来把一个商品添加到购物车中。
- 在
product-details.component.ts中导入购物车服务。
src/app/product-details/product-details.component.ts
import { Component, OnInit } from '@angular/core';
import { ActivatedRoute } from '@angular/router';

import { Product, products } from '../products';
import { CartService } from '../cart.service';
- 通过把购物车服务注入到这里的
constructor()中来注入它。
src/app/product-details/product-details.component.ts
export class ProductDetailsComponent implements OnInit {

  constructor(
    private route: ActivatedRoute,
    private cartService: CartService
  ) { }
}
- 定义
addToCart()方法,该方法会当前商品添加到购物车中。
src/app/product-details/product-details.component.ts
export class ProductDetailsComponent implements OnInit {
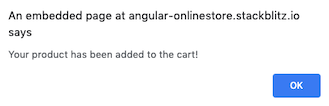
addToCart(product: Product) {
this.cartService.addToCart(product);
window.alert('Your product has been added to the cart!');
}
}
addToCart()方法做了如下事情:
以当前'product'作为参数
使用
CartService``addToCart()方法去添加产品到购物车中显示一条你已经添加了一个产品到购物车到消息
在
product-details.component.html中,添加一个带有 Buy标签的按钮,并且把其click()事件绑定到addToCart()方法上。这段代码会为产品详情模板添加一个 Buy按钮,并把当前产品添加到购物车中。
src/app/product-details/product-details.component.html
<h2>Product Details</h2>

<div *ngIf="product">
  <h3>{{ product.name }}</h3>
  <h4>{{ product.price | currency }}</h4>
  <p>{{ product.description }}</p>
  <button type="button" (click)="addToCart(product)">Buy</button>
</div>
- 刷新应用,以验证新的 Buy按钮如预期般出现了,并且单击某个产品的名称,以展示其详情。
Verify that the new Buybutton appears as expected by refreshing the application and clicking on a product's name to display its details.
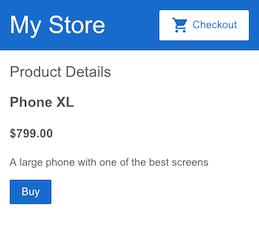
- 点击“Buy”按钮来把该商品添加到购物车中存储的商品列表中,并显示一条确认消息。
Click the Buybutton to add the product to the stored list of items in the cart and display a confirmation message.
# 创建购物车视图
为了让顾客看到他们的购物车,你可以用两步创建购物车视图:
创建一个购物车组件并配置指向这个新组件的路由。
显示购物车商品。
# 设置该组件
要创建购物车视图,可遵循与创建 ProductDetailsComponent相同的步骤,并且为这个新组件配置路由。
- 通过运行以下命令在终端中生成一个名为
cart的新组件:
ng generate component cart
此命令将生成 cart.component.ts文件及其关联的模板和样式文件。
src/app/cart/cart.component.ts
import { Component } from '@angular/core';

@Component({
  selector: 'app-cart',
  templateUrl: './cart.component.html',
  styleUrls: ['./cart.component.css']
})
export class CartComponent {

}
StackBlitz 还在组件中默认生成一个 ngOnInit()。对于本教程,你可以忽略 CartComponent的 ngOnInit()。
- 请注意,新创建的
CartComponent已添加到app.module.ts中模块的declarations中。
src/app/app.module.ts
import { CartComponent } from './cart/cart.component';

@NgModule({
  declarations: [
    AppComponent,
    TopBarComponent,
    ProductListComponent,
    ProductAlertsComponent,
    ProductDetailsComponent,
    CartComponent,
  ],
- 打开
app.module.ts,为组件CartComponent添加一个路由,其路由为cart。
src/app/app.module.ts
@NgModule({
  imports: [
    BrowserModule,
    ReactiveFormsModule,
    RouterModule.forRoot([
      { path: '', component: ProductListComponent },
      { path: 'products/:productId', component: ProductDetailsComponent },
      { path: 'cart', component: CartComponent },
    ])
  ],
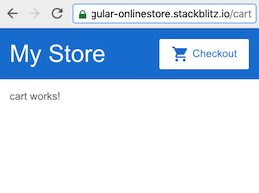
- 修改 "Checkout" 按钮,以便让它路由到
/cart。在top-bar.component.html中添加一个指向/cart的routerLink指令。
src/app/top-bar/top-bar.component.html
<a routerLink="/cart" class="button fancy-button">
  <i class="material-icons">shopping_cart</i>Checkout
</a>
- 要查看新的购物车组件,请点击“Checkout”按钮。你会看到默认文本“cart works!”,该 URL 的格式为
https://getting-started.stackblitz.io/cart,其中的 getting-started.stackblitz.io 部分可能与你的 StackBlitz 项目不同。
# 显示购物车商品
本节将告诉你如何修改购物车组件以使用购物车服务来显示购物车中的商品。.
- 在
cart.component.ts中,从cart.service.ts文件中导入CartService。
src/app/cart/cart.component.ts
import { Component } from '@angular/core';
import { CartService } from '../cart.service';
- 注入
CartService,以便购物车组件可以使用它。
src/app/cart/cart.component.ts
export class CartComponent {

  constructor(
    private cartService: CartService
  ) { }
}
- 定义
items属性,以便把商品存放在购物车中。
src/app/cart/cart.component.ts
export class CartComponent {

  items = this.cartService.getItems();

  constructor(
    private cartService: CartService
  ) { }
}
这段代码使用 CartService的 getItems()方法来设置条目。你以前在创建 cart.service.ts时定义过此方法。
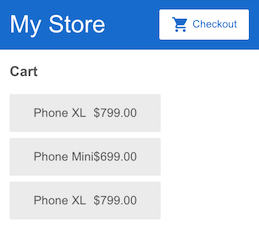
- 修改模板,加上标题,用带有
*ngFor的<div>来显示每个购物车商品的名字和价格。
生成的 CartComponent模板如下:
src/app/cart/cart.component.html
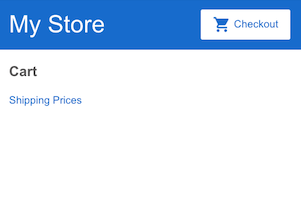
<h3>Cart</h3>

<div class="cart-item" *ngFor="let item of items">
  <span>{{ item.name }}</span>
  <span>{{ item.price | currency }}</span>
</div>
验证你的购物车如预期般工作:
点击 My Store。
单击商品名称以显示其详细信息。
点击Buy将商品添加到购物车。
点击Checkout查看购物车。
要了解关于服务的更多信息,请参阅“服务和依赖注入简介”。
# 检索运费价格
服务器通常采用流的形式返回数据。流是很有用的,因为它们可以很容易地转换返回的数据,也可以修改你请求数据的方式。Angular 的 HTTP 客户端(HttpClient)是一种内置的方式,可以从外部 API 中获取数据,并以流的形式提供给你的应用。
本节会为你展示如何使用 HttpClient从外部文件中检索运费。
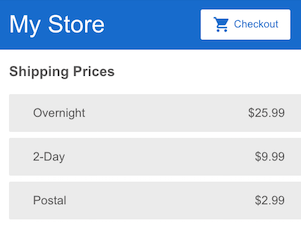
在本指南的 StackBlitz 应用中,通过 assets/shipping.json文件提供了一些预定义的配送数据。你可以利用这些数据为购物车中的商品添加运费。
src/assets/shipping.json
[
  {
    "type": "Overnight",
    "price": 25.99
  },
  {
    "type": "2-Day",
    "price": 9.99
  },
  {
    "type": "Postal",
    "price": 2.99
  }
]
# 配置 AppModule以使用 HttpClient
要使用 Angular 的 HTTP 客户端之前,你必须先配置你的应用来使用 HttpClientModule。
Angular 的 HttpClientModule中注册了在整个应用中使用 HttpClient服务的单个实例所需的服务提供者。
- 在
app.module.ts的顶部从@angular/common/http包中导入HttpClientModule以及其它导入项。由于有很多其它导入项,因此这里的代码片段省略它们,以保持简洁。请确保现有的导入都还在原地。
src/app/app.module.ts
import { HttpClientModule } from '@angular/common/http';
- 把
HttpClientModule添加到AppModule``@NgModule()的imports数组中,以便全局注册 Angular 的HttpClient。
src/app/app.module.ts
@NgModule({
  imports: [
    BrowserModule,
    HttpClientModule,
    ReactiveFormsModule,
    RouterModule.forRoot([
      { path: '', component: ProductListComponent },
      { path: 'products/:productId', component: ProductDetailsComponent },
      { path: 'cart', component: CartComponent },
    ])
  ],
  declarations: [
    AppComponent,
    TopBarComponent,
    ProductListComponent,
    ProductAlertsComponent,
    ProductDetailsComponent,
    CartComponent,
  ],
  bootstrap: [
    AppComponent
  ]
})
export class AppModule { }
# 配置 CartService以使用 HttpClient
下一步是注入 HttpClient服务到你的服务中, 这样你的应用可以获取数据并且与外部 API 和资源互动。
- 从
@angular/common/http包中导入HttpClient。
src/app/cart.service.ts
import { HttpClient } from '@angular/common/http';
import { Product } from './products';
import { Injectable } from '@angular/core';
- 把
HttpClient注入到CartService的构造函数中。
src/app/cart.service.ts
@Injectable({
  providedIn: 'root'
})
export class CartService {
  items: Product[] = [];

  constructor(
    private http: HttpClient
  ) {}
/* . . . */
}
# 配置 CartService以得到商品价格
要从 shipping.json中得到商品数据, 你可以使用 HttpClient``get()方法。
- 在
cart.service.ts中clearCart()方法下面,定义一个新的getShippingPrices()方法,该方法会调用HttpClient#get()方法。
src/app/cart.service.ts
@Injectable({
  providedIn: 'root'
})
export class CartService {
/* . . . */
  getShippingPrices() {
    return this.http.get<{type: string, price: number}[]>('/assets/shipping.json');
  }
}
要了解关于 Angular HttpClient的更多信息,请参阅客户端-服务器集成指南。
# 创建配送组件
现在你的应用已经可以检索配送数据了,你还要创建一个配送组件和相关的模板。
- 在终端窗口中运行如下命令,以生成名为
shipping的组件:
ng generate component shipping
该命令会生成 shipping.component.ts文件及其关联的模板和样式文件。
src/app/shipping/shipping.component.ts
import { Component } from '@angular/core';

@Component({
  selector: 'app-shipping',
  templateUrl: './shipping.component.html',
  styleUrls: ['./shipping.component.css']
})
export class ShippingComponent {

}
- 在
app.module.ts中,添加一个配送路由。其path为shipping,其 component 为ShippingComponent。
src/app/app.module.ts
@NgModule({
  imports: [
    BrowserModule,
    HttpClientModule,
    ReactiveFormsModule,
    RouterModule.forRoot([
      { path: '', component: ProductListComponent },
      { path: 'products/:productId', component: ProductDetailsComponent },
      { path: 'cart', component: CartComponent },
      { path: 'shipping', component: ShippingComponent },
    ])
  ],
  declarations: [
    AppComponent,
    TopBarComponent,
    ProductListComponent,
    ProductAlertsComponent,
    ProductDetailsComponent,
    CartComponent,
    ShippingComponent
  ],
  bootstrap: [
    AppComponent
  ]
})
export class AppModule { }
新的配送组件尚未链接到任何其它组件,但你可以通过输入其路由指定的 URL 在预览窗格中看到它的模板。该 URL 具有以下模式:https://angular-ynqttp--4200.local.webcontainer.io/shipping,其 angular-ynqttp--4200.local.webcontainer.io部分可能与你的 StackBlitz 项目有所不同。
# 配置 ShippingComponent以使用 CartService
这个章节将指导你修改 ShippingComponent以通过 HTTP 从 shipping.json文件中提取商品数据。
- 在
shipping.component.ts中导入CartService。
src/app/shipping/shipping.component.ts
import { Component, OnInit } from '@angular/core';

import { Observable } from 'rxjs';
import { CartService } from '../cart.service';
- 把购物车服务注入到
ShippingComponent的constructor()构造函数中。
src/app/shipping/shipping.component.ts
constructor(private cartService: CartService) { }
- 定义一个
shippingCosts属性,并从CartService中利用购物车服务的getShippingPrices()方法设置它。在ngOnInit()方法内部初始化shippingCosts属性。
src/app/shipping/shipping.component.ts
export class ShippingComponent implements OnInit {

  shippingCosts!: Observable<{ type: string, price: number }[]>;

  ngOnInit(): void {
    this.shippingCosts =  this.cartService.getShippingPrices();
  }

}
- 利用
async管道修改配送组件的模板,以显示配送类型和价格。
src/app/shipping/shipping.component.html
<h3>Shipping Prices</h3>

<div class="shipping-item" *ngFor="let shipping of shippingCosts | async">
  <span>{{ shipping.type }}</span>
  <span>{{ shipping.price | currency }}</span>
</div>
async管道从数据流中返回最新值,并在所属组件的生命期内持续返回。当 Angular 销毁该组件时,async管道会自动停止。关于 async管道的详细信息,请参阅 AsyncPipe API 文档 。
- 在购物车视图中添加一个到配送视图的链接。
src/app/cart/cart.component.html
<h3>Cart</h3>

<p>
  <a routerLink="/shipping">Shipping Prices</a>
</p>

<div class="cart-item" *ngFor="let item of items">
  <span>{{ item.name }}</span>
  <span>{{ item.price | currency }}</span>
</div>
- 点击 Checkout按钮,查看更新后的购物车。注意,修改本应用会导致预览窗格刷新,这会清空购物车。
 点击此链接可以导航到运费页。
# 下一步呢?
现在你有了一个带有商品名录和购物车的商店应用了,而且你还可以查询运费。
要继续探索 Angular,你可以:
继续阅读表单与用户输入部分,添加购物车视图和结账视图,以完成本应用。
跳到部署部分来转为本地开发,或者把你的应用部署到 Firebase 或你自己的服务器上。
← 添加导航 使用表单进行用户输入 →